Reference: Logging CAN traces
It would be tedius if you have to get inside the target vehicle, set up the simulation environment and test everytime there is a new update on your implementation. Which is why having a CAN trace log file is important because it eases the development process. With a log file, you can develop and test your application on your desk without having to be in the vehicle which saves time and energy that otherwise would be spent significantly on setting up the test environment.
Although canplayer from the can-utils library in Raspberry-Pi is compliant only with the .log format, it is recommended to use the Vector tools to get CAN traces since they can provide the traces in a variety of formats such that the traces can be used with not only canplayer but also several other means in different environments. Therefore the two ways, with and without the Vector tools, to log CAN traces in the target vehicle are introduced here.
Option 1: with Vector Tools
Hardware Prerequisites
- Laptop installed with Vector Software
- Licensed Vector CANcase (VN1630 is used here)
- USB Interface for CAN and I/O (comes with CANcase)
- CAN Cable (D-sub /D-sub) x 1
- CAN Adapter (Open cable to D-sub) x 1
Software Prerequisites
- Vector Software (CANalyzer Version 13.0 SP2 is used here)
Logging with Vector Tools
- Connect the Vector CANcase to the CAN H/L from an ECU in the vehicle by using the CAN cable and adapter. For this you also need to refer to the ECU hardware specification to get to know which ports of the ECU stand for CAN-high and -low of what number of CAN channel.
- Connect the Vector CANcase to your laptop and check if the device manager recognizes the CANcase.
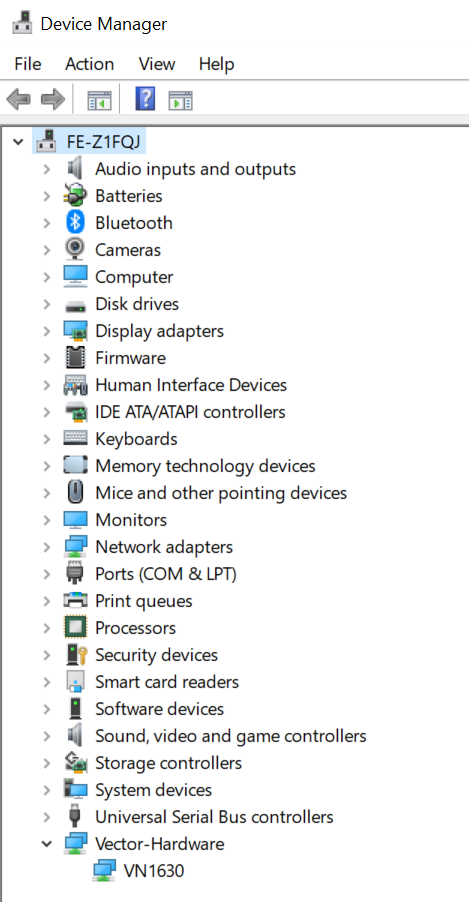
- Because the CANcase used here is Vector VN1630, it shows the exact name of the CANcase.
- Run CANalyzer 13.0 SP2.

- The capture shows when your CANcase is properly licensed with
CANalyzer PRO 13.0. Press “OK” to proceed.

- The capture shows when your CANcase is not licensed. You can not proceed further in this case.
- The first thing you would see in CANalyzer is the “Trace” tab. Here you can see the incoming CAN traces when they are being read.

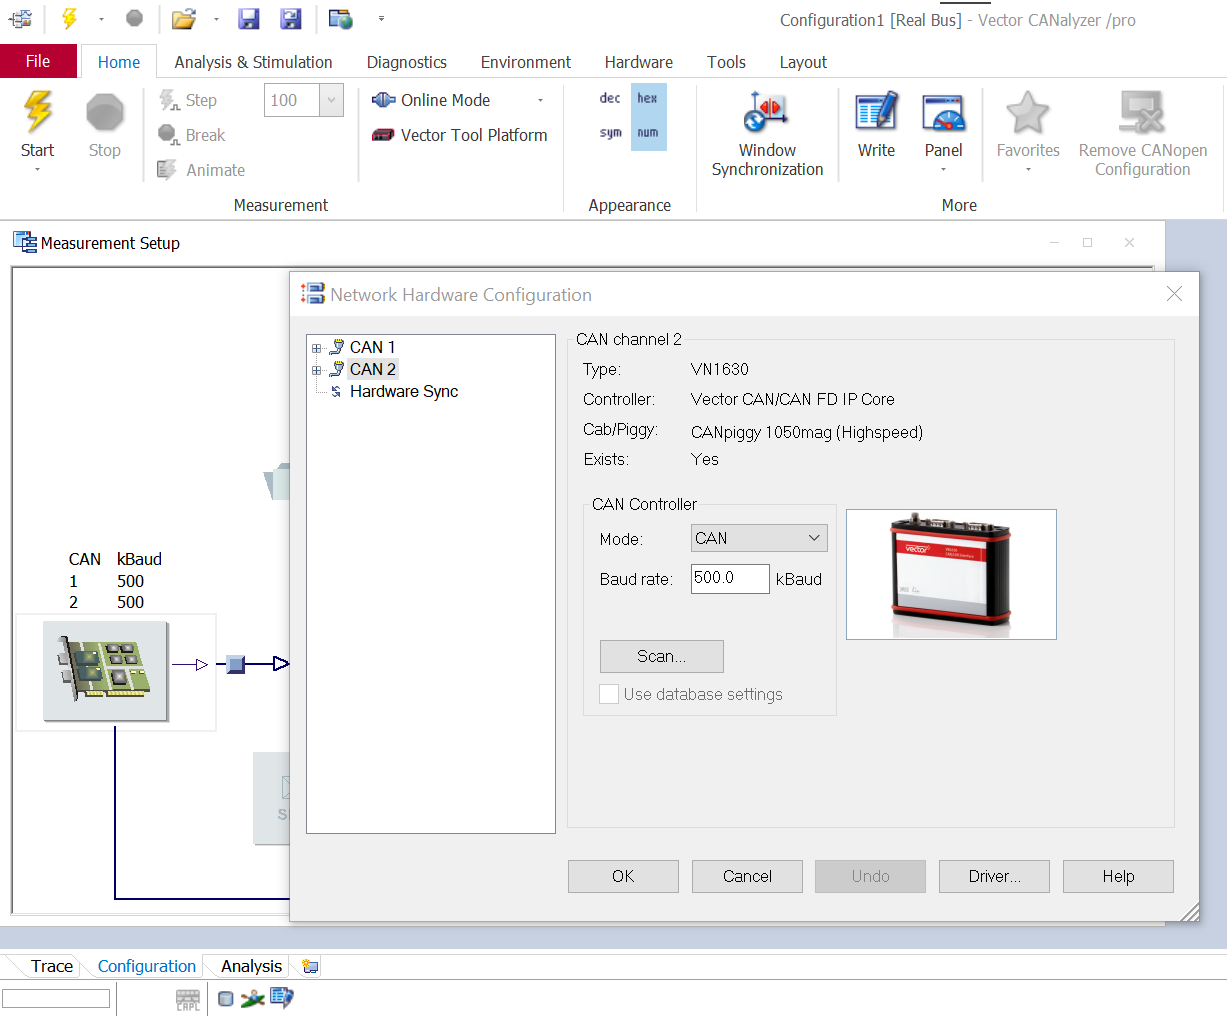
- To synchronize your CANcase with the target vehicle’s baudrate, you have to configure manually in CANalyzer. To do this, switch to the “Configuration” tab.

- When you double-click the CANcase icon, a window named “Network Hardware Configuration” would show up. Select the CAN channel (VN1630: written on the back side of CANcase) that you connected to the CAN ports of the target vehicle and set the baudrate the same as that of the vehicle. Then click “OK”.
- To enable the logging function, find the “Logging” box on the right hand side of the configuration tap and double-click the small node on the left.
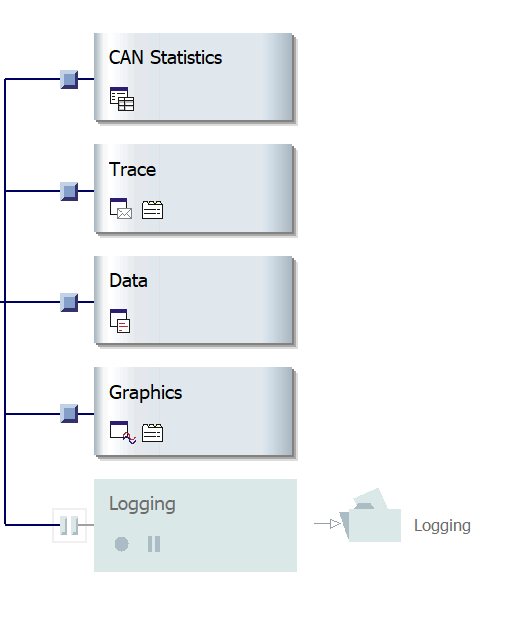
- Confirm that the “Logging” box is enabled as the capture below.

- To change the destination folder or the result file format, double-click the folder-shaped icon on the right and set them as you prefer.

- If you want to use the result for
canplayerin Raspberry-Pi, set the result file format as “ASCII Frame Logging (*.asc)”. That way, you can convert your result to the .log format by runningasc2log_channel_separator.pythat can be found indias_kuksa/utils/canplayer/.
- Make sure everything is properly connected and configured. You can now start logging CAN traces by pressing the “Start” button on the top left hand corner.

- If working correctly, you are supposed to able to see the incoming CAN traces on the “Trace” tab.
Option 2: with Raspberry-Pi and CAN Shield
Hardware Prerequisites
- Laptop to ssh Raspberry-Pi
- Raspberry Pi 3 or 4
- CAN Shield (SKPang PiCan2 or Seeed 2 Channel CAN)
- CAN Cable (D-sub /D-sub) x 1
- CAN Adapter (Open cable to D-sub) x 1
Software Prerequisites
- Network that can be shared by the laptop and Raspberry-Pi (for SSH purpose, you can also use your mobile hotspot.)
- The
can-utilslibrary (can-utils)
Logging with Raspberry-Pi and CAN Shield
Assuming the CAN shield is already attached to Raspberry-Pi, connect the shield to the CAN H/L from an ECU in the vehicle by using the CAN cable and adapter. For this you also need to refer to the ECU hardware specification to get to know which ports of the ECU stand for CAN-high and -low of what number of CAN channel.
Once you successfully ssh Raspberry-Pi, you would be on your Raspberry-Pi’s terminal. Install the
can-utilslibrary if you haven’t yet:$ sudo apt install can-utils
Configure the CAN shield.
- For SKPang PiCan2, refer to CAN Interface Option 2 - SKPang PiCan2 (Only for Raspberry-Pi).
- For Seeed 2 Channel CAN, refer to CAN Interface Option 3 - Seeed 2-Channel Shield (Only for Raspberry-Pi).
Make sure everything is properly connected and configured. Assuming the name of the configured CAN interface is
can0, command the following:$ candump -l can0
- If working correctly, you are supposed to able to see the .log file named with the current time (e.g.,
candump-2020-10-06_163848.log) in the same directory where the terminal is open.
- If you want to stop logging, input
ctrl+cand check the result .log file to see if CAN traces have been logged properly.